I have been very low on creative energy for a while now due to various factors. Nevertheless here are some close ups of our festive decor from December. I couldn't find the energy to style the whole room so all you are getting is close ups. I was the only person in my family who noticed it wasn't "done" so I think it's OK.
Friday, December 31, 2010
Saturday, November 20, 2010
Reno news - the paneling
I have seen the board and batten style wall paneling oh, um, let's just say on every design blog I read. Ya, that would cover it. So I have been dreaming of it for quite some time. Yes, I doodle pictures of wall paneling on the note pad by the phone. A lot.
So to say I am pleased with how this turned out is a bit of an understatement. The hubby wasn't exactly sure what I wanted or why you would want to go to all this trouble for rectangles on the wall. But bless his heart he agreed to it anyway and I think it makes the room. Don't worry, because I know you were, there will be many more paneling pictures to come!
The Walls...
BEFORE
ok you can kinda see how plaid the wall was on the left of this pic
DURING
AFTER
Now some pictures on that wall and all will be right with the world.
;^)
Friday, November 19, 2010
Reno news - part two
And more of the same. Here is the ongoing progress in the new family room. It is far from done, the trim and tiles around the fireplace are still on the list. Also the cover for that electrical panel and another one for the crawl space on the opposite wall. A window sill, curtains, and much decorating is still to do. Please note the (very ugly) surround sound system for the (very large) TV is all set up. Ahem, priorities. But anyway, here is the progress.
Family Room Fireplace...
BEFORE
DURING
AFTER
I think the IKEA hacked built-ins turned out ok. And the mantel my smart hubby made all from one flat sheet of MDF. Can't wait to decorate all that mantel for Christmas! What do ya think? And I do hope it's obvious that the before pic is BEFORE we bought the house. Please tell me you knew that!
Thursday, November 18, 2010
Reno news- it gets worse before it gets better
I am doing a few little update posts about the basement as it is coming along v e r y s l o w l y.
And as much as I love before and after pictures it will be a while 'til it's done and we get some pretty pictures. I have decided to show it just as it is now. So here is the progress so far.
Downstairs landing....
BEFORE
DURING
AFTER
The doors to the rooms are paneled but the closet doors are flat. Although this is a room in the first picture now it is a closet for A's tools. I need something cute for that wall...
And sadly, despite my lovely mudroom, I need more space for shoes and coats downstairs so I might hang another peg rack on the right on the wall you can't see in this picture.
Friday, November 12, 2010
The boys room and a LEGO solution
I have shown many pictures of my little girl's room and only a few of the boys' room. It is true that her room is cuter and she is young enough that I can pretty much do what ever I want in there.
But there is another reason the boys room is photographed less. In a word: LEGO. All of it lives in there room because they started acquiring LEGO while Laine was a baby. To prevent any unfortunate choking incidents we limited LEGO to their room and when they played with it we simply shut their door. Worked great, as evidenced by the fact that Laine is breathing even to this day.
But as the LEGO piled up we needed an organization system. We sorted all the pieces by colour which is great! But the bucket of guys, ahem, I mean minifigs was constantly getting dumped on the floor. Some creative minds like to build different guys every day apparently. So here is what I came up with...
And lastly here are some pictures of their room on a rare day when it was clean...


There is just something about twin beds. Ahh.
Tuesday, November 9, 2010
Renewed Master Bedroom
So last post I showed off the dressers I repainted.
I am pretty happy with the way the room turned out. I still would like to change the wall colour but I am telling myself one day we will do some drywalling when we remove those valances over the windows and that will be my chance. Maybe if I bribe him with coffee??
So besides hanging my jewelry and getting new bedside tables I convinced him to get a rug! Well really it is two rugs but more on that in a minute. Here is the whole room....
I ginormous rug big enough to fit under our whole bed and stick out enough to make it warm on your feet when getting out of bed would not be cheap. So I entertained the idea of 2 smaller rugs. And I knew I wanted grey.
This rug is 6'5" x 4'4" and two pushed together is about the perfect size for under our queen bed. Did I mention each rug only cost $29.99? IKEA I really do love you, despite the questionable lunch I had the other day. I guess I can forgive you now that my floor is warm and cozy for 60 bucks. Thanks IKEA!
Sunday, November 7, 2010
Dressers Reinvented
Have I told you that before and afters are my absolute favorite things ever. Never, ever tire of them. I love it. This is another one of those painting projects that was completely free. I love free too. Who doesn't, really?
Free Labour
These dressers (really one bedside table and one dresser) came to us by way of Aaron's grandmother. The dresser we have in our dining room was also hers that we painted about 7 years ago. She is a special lady so that makes this furniture special too! The paint (one primer coat and 2 coats BM's Cloud White eggshell) was in the basement and the knobs were part of one of those mega packs that Aaron bought super cheap. Most of them are destined to go in the downstairs rooms we are working on but I did the math (right I hope) and we could spare 5 for this job.
They are wood and fairly solid. A bonus for starters. There was a bit of a striated yellow beige finish on them that was fixed by a little sanding. Then I painted them up and that was it. I decided not to break out the paint sprayer for this job. Since they are so flat with very little detail the roller was sufficient. Also Aaron was using the air compressor for trim and such so it was just easier to do my own thing.
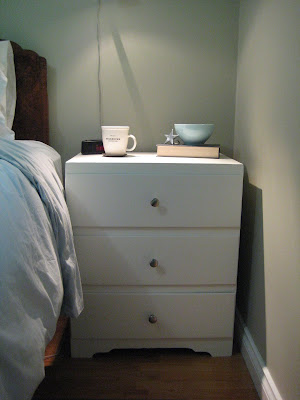
So here is my side of the bed. I get the smaller one because I have less room. I also have the phone on my side so I am not sure how that worked out! Isn't it cute?
Before
After
And this is Aaron's side of the bed. I am hoping he will move some stuff out of the closet and into these drawers thus giving me more closet space. So far no luck. He maintains I already hog the closet.
Before
After
So there you go. It was a fairly minor project but it really makes a big difference. There is one other new element. I'll show it off in the pictures of the full room next post.
Subscribe to:
Posts (Atom)